关于Robust
Robust使用
环境配置
在App的build.gradle,加入如下依赖
1
2
3
4
5
apply plugin: 'com.android.application'
//制作补丁时将这个打开,auto-patch-plugin紧跟着com.android.application
//apply plugin: 'auto-patch-plugin'
apply plugin: 'robust'
compile 'com.meituan.robust:robust:0.4.82'在整个项目的build.gradle加入classpath
1
2
3
4
5
6
7
8
9
buildscript {
repositories {
jcenter()
}
dependencies {
classpath 'com.meituan.robust:gradle-plugin:0.4.82'
classpath 'com.meituan.robust:auto-patch-plugin:0.4.82'
}
}在项目的src同级目录下配置robust.xml文件,具体项请参考DEMOapp/robust.xml
1
2
3
4
5
6
7
8
9
10
11
12
13
14
15
16
17
18
19
20
21
22
23
24
25
26
27
28
29
30
31
32
33
34
35
36
37
38
39
40
41
42
43
44
45
46
47
48
49
50
51
52
53
54
55
56
57
58
59
60
61
<resources>
<switch>
<!--true代表打开Robust,请注意即使这个值为true,Robust也默认只在Release模式下开启-->
<!--false代表关闭Robust,无论是Debug还是Release模式都不会运行robust-->
<turnOnRobust>true</turnOnRobust>
<!--<turnOnRobust>false</turnOnRobust>-->
<!--是否开启手动模式,手动模式会去寻找配置项patchPackname包名下的所有类,自动的处理混淆,然后把patchPackname包名下的所有类制作成补丁-->
<!--这个开关只是把配置项patchPackname包名下的所有类制作成补丁,适用于特殊情况,一般不会遇到-->
<!--<manual>true</manual>-->
<manual>false</manual>
<!--是否强制插入插入代码,Robust默认在debug模式下是关闭的,开启这个选项为true会在debug下插入代码-->
<!--但是当配置项turnOnRobust是false时,这个配置项不会生效-->
<!--<forceInsert>true</forceInsert>-->
<forceInsert>false</forceInsert>
<!--是否捕获补丁中所有异常,建议上线的时候这个开关的值为true,测试的时候为false-->
<catchReflectException>true</catchReflectException>
<!--<catchReflectException>false</catchReflectException>-->
<!--是否在补丁加上log,建议上线的时候这个开关的值为false,测试的时候为true-->
<!--<patchLog>true</patchLog>-->
<patchLog>false</patchLog>
<!--项目是否支持progaurd-->
<proguard>true</proguard>
<!--<proguard>false</proguard>-->
<!--项目是否支持ASM进行插桩,默认使用ASM,推荐使用ASM,Javaassist在容易和其他字节码工具相互干扰-->
<useAsm>true</useAsm>
<!--<useAsm>false</useAsm>-->
</switch>
<!--需要热补的包名或者类名,这些包名下的所有类都被会插入代码-->
<!--这个配置项是各个APP需要自行配置,就是你们App里面你们自己代码的包名,
这些包名下的类会被Robust插入代码,没有被Robust插入代码的类Robust是无法修复的-->
<packname name="hotfixPackage">
<name>com.meituan</name>
<name>com.sankuai</name>
<name>com.dianping</name>
</packname>
<!--不需要Robust插入代码的包名,Robust库不需要插入代码,如下的配置项请保留,还可以根据各个APP的情况执行添加-->
<exceptPackname name="exceptPackage">
<name>com.meituan.robust</name>
<name>com.meituan.sample.extension</name>
</exceptPackname>
<!--补丁的包名,请保持和类PatchManipulateImp中fetchPatchList方法中设置的补丁类名保持一致( setPatchesInfoImplClassFullName("com.meituan.robust.patch.PatchesInfoImpl")),
各个App可以独立定制,需要确保的是setPatchesInfoImplClassFullName设置的包名是如下的配置项,类名必须是:PatchesInfoImpl-->
<patchPackname name="patchPackname">
<name>com.meituan.robust.patch</name>
</patchPackname>
<!--自动化补丁中,不需要反射处理的类,这个配置项慎重选择-->
<noNeedReflectClass name="classes no need to reflect">
</noNeedReflectClass>
</resources>
自动生成补丁
使用插件时,需要把auto-patch-plugin放置在com.android.application插件之后,其余插件之前。
1
2
apply plugin: 'com.android.application'
apply plugin: 'auto-patch-plugin'将保存下来的mapping文件和methodsMap.robust文件放在app/robust/文件夹下。
修改代码,在改动的方法上面添加@Modify注解,对于Lambda表达式请在修改的方法里面调用RobustModify.modify()方法
1
2
3
4
5
6
7
8
9
10
11
@Modify
protected void onCreate(Bundle savedInstanceState) {
super.onCreate(savedInstanceState);
}
//或者是被修改的方法里面调用RobustModify.modify()方法
protected void onCreate(Bundle savedInstanceState) {
RobustModify.modify()
super.onCreate(savedInstanceState);
}
```
新增的方法和字段使用@Add注解//增加方法
@Add
public String getString() {return "Robust";}
//增加类
@Add
public class NewAddCLass {public static String get() { return "robust"; }}
1
4. 运行和生成线上apk同样的命令,即可生成补丁,补丁目录app/build/outputs/robust/patch.jar
./gradlew clean assembleRelease –stacktrace –no-daemon1
2
3
4
5
6
7
8
9
10
11
12
13
14
15
16
175. 补丁制作成功后会停止构建apk,出现类似于如下的提示,表示补丁生成成功

## Robust实现原理
Robust热修复框架的大概原理为:用DexClassLoader加载修复包,然后用loadClass方法加载修复类,new出新对象,再把这新的修复对象设置到指定类的changeQuickRedirect静态变量中即可。
官方给出的流程图如下:
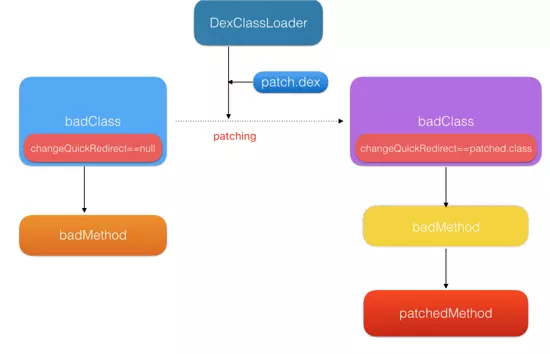
下文中我们将分编译阶段、补丁结构、补丁生效和补丁执行4个阶段来介绍Robust实现原理。
### 编译阶段
Robust将apk代码中每个函数都在编译打包阶段自动的插入一段代码:
//原函数
public long getIndex() {
return 100;
}
//使用Robust插件编译后
public static ChangeQuickRedirect changeQuickRedirect;
public long getIndex() {
if(changeQuickRedirect != null) {
if(PatchProxy.isSupport(new Object[0], this, changeQuickRedirect, false)) {
return ((Long)PatchProxy.accessDispatch(new Object[0], this, changeQuickRedirect, false)).longValue();
}
}
return 100L;
}1
2
3
4
5
6
7
8
9
10
11
12
13
14
15
16
17
18
19
可以看到Robust为每个class增加了个类型为ChangeQuickRedirect的静态成员,而在每个方法前都插入了使用changeQuickRedirect相关的逻辑,当changeQuickRedirect不为null时,会执行到accessDispatch方法从而替换掉之前老的逻辑,达到修复的目的。
### 补丁结构
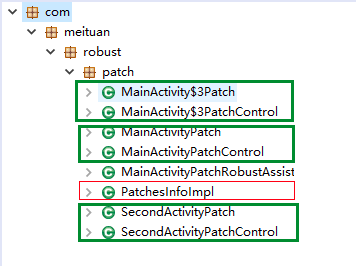
Robust会根据@Modify、@Add等注解搜集所有要修改的函数,并将修复后的文件打包成dex或jar。
补丁文件主要包含:PatchesInfoImpl.java,xxxPatchControl.java,xxxPatch.java(其中xxx为原类的名字),如下图:
PatchesInfoImpl只有一个,补丁修改了3个类,因此有3对Patch和PatchControl类
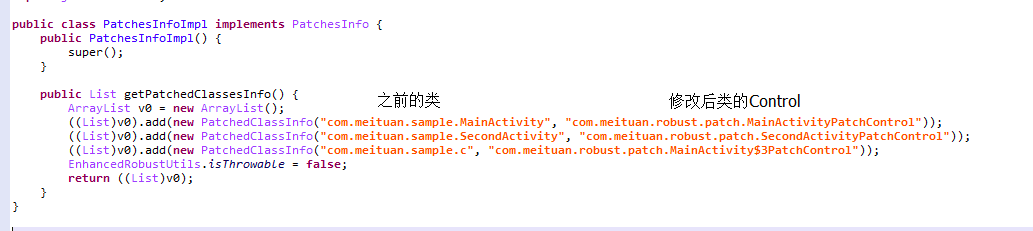
其中
- PatchesInfoImpl.java中定义了修复前后class的对应关系:

- 每个xxxPatchControl.java中都存在以下静态成员变量和方法:
public class xxxPatchControl implements ChangeQuickRedirect
{
public static final String MATCH_ALL_PARAMETER = "(\\w*\\.)*\\w*";

private static final Map<Object, Object> keyToValueRelation = new WeakHashMap();

//获取函数的参数的方法
public Object getRealParameter(Object obj){..具体逻辑..}

//判断是否支持修复
public boolean isSupport(String methodName, Object[] paramArrayOfObject)
{..具体逻辑.}

//执行到accessDispatch方法替换旧的类方法
public Object accessDispatch(String methodName, Object[] paramArrayOfObject) {.具体逻辑..}
}

//解决boolean被优化成byte的问题
private static Object fixObj(Object booleanObj) {.具体逻辑..}
}1
2
3
4
5
6
7
- xxxPatch.java中是修改后函数的具体实现,例如下图中修改了getTextInfo()方法的返回值
### 补丁生效
补丁生效通常在App启动时调用
new PatchExecutor(getApplicationContext(), new PatchManipulateImp(), new RobustCallBackSample()).start();1
PatchExecutor继承Thread类,启动后会调用fetchPatchList()函数拉取补丁,调用applyPatchList()使补丁生效。其具体实现如下:
//可以看到PatchExecutor继承线程类Thread
public class PatchExecutor extends Thread {
protected Context context;
protected PatchManipulate patchManipulate;
protected RobustCallBack robustCallBack;
//构造函数
public PatchExecutor(Context context, PatchManipulate patchManipulate, RobustCallBack robustCallBack) {
this.context = context.getApplicationContext();
this.patchManipulate = patchManipulate;
this.robustCallBack = robustCallBack;
}
public void run() {
try {
//拉取补丁列表
List
//应用补丁列表
applyPatchList(patches);
} catch (Throwable t) {
Log.e(“robust”, “PatchExecutor run”, t);
robustCallBack.exceptionNotify(t, “class:PatchExecutor,method:run,line:36”);
}
}
…
}1
2- 获取补丁
fetchPatchList最终调用PatchManipulateImp类的fetchPatchList方法
protected List<Patch> fetchPatchList(Context context) {
    //将app自己的robustApkHash上报给服务端,服务端根据robustApkHash来区分每一次apk build来给app下发补丁
    //apkhash is the unique identifier for  apk,so you cannnot patch wrong apk.
    String robustApkHash = RobustApkHashUtils.readRobustApkHash(context);
    Log.w("robust","robustApkHash :" + robustApkHash);
    //在这里去联网获取补丁列表
    Patch patch = new Patch();
    patch.setName("123");
    //LocalPath是存储原始的补丁文件,这个文件应该是加密过的,TempPath是加密之后的,TempPath下的补丁加载完毕就删除,保证安全性
    //这里面需要设置一些补丁的信息,主要是联网的获取的补丁信息。重要的如MD5,进行原始补丁文件的简单校验,以及补丁存储的位置,这边推荐把补丁的储存位置放置到应用的私有目录下,保证安全性
    patch.setLocalPath(Environment.getExternalStorageDirectory().getPath()+ File.separator+"robust"+File.separator + "patch");

    //setPatchesInfoImplClassFullName 设置项各个App可以独立定制,需要确保的是setPatchesInfoImplClassFullName设置的包名是和xml配置项patchPackname保持一致,而且类名必须是:PatchesInfoImpl
    //请注意这里的设置
    patch.setPatchesInfoImplClassFullName("com.meituan.robust.patch.PatchesInfoImpl");
    List  patches = new ArrayList<Patch>();
    patches.add(patch);
    return patches;
}
1 |
|
protected void applyPatchList(List
for (Patch p : patches) {
    if (p.isAppliedSuccess()) {
        Log.d("robust", "p.isAppliedSuccess() skip " + p.getLocalPath());
        continue;
    }
    if (patchManipulate.ensurePatchExist(p)) {
        boolean currentPatchResult = false;
        try {
        //真正应用补丁的方法patch()
            currentPatchResult = patch(context, p);
        } catch (Throwable t) {
            robustCallBack.exceptionNotify(t, "class:PatchExecutor method:applyPatchList line:69");
        }
        if (currentPatchResult) {
            //设置patch 状态为成功
            p.setAppliedSuccess(true);
            //统计PATCH成功率 PATCH成功
            robustCallBack.onPatchApplied(true, p);

        } else {
            //统计PATCH成功率 PATCH失败
            robustCallBack.onPatchApplied(false, p);
        }

        Log.d("robust", "patch LocalPath:" + p.getLocalPath() + ",apply result " + currentPatchResult);

    }
}
}1
2
跟踪patch()函数的实现:
protected boolean patch(Context context, Patch patch) {
//验证patch的hash
if (!patchManipulate.verifyPatch(context, patch)) {
return false;
}
//调用DexClassLoader动态加载dex
DexClassLoader classLoader = new DexClassLoader(patch.getTempPath(), context.getCacheDir().getAbsolutePath(),null, PatchExecutor.class.getClassLoader());
patch.delete(patch.getTempPath());
    Class patchClass, oldClass;

    Class patchsInfoClass;
    PatchesInfo patchesInfo = null;

//动态加载PatchesInfoImpl,获取要patch的类,之前介绍过PatchesInfoImpl.java中保存了所有要patch的类以及映射
    try {
        patchsInfoClass = classLoader.loadClass(patch.getPatchesInfoImplClassFullName());
        patchesInfo = (PatchesInfo) patchsInfoClass.newInstance();
    } catch (Throwable t) {
        Log.e("robust", "PatchsInfoImpl failed,cause of" + t.toString());
        t.printStackTrace();
    }
//调用PatchesInfoImpl的getPatchedClassesInfo,返回一个List
    List<PatchedClassInfo> patchedClasses = patchesInfo.getPatchedClassesInfo();


//循环类名,将patchedClasses中的类打补丁
    for (PatchedClassInfo patchedClassInfo : patchedClasses) {
        String patchedClassName = patchedClassInfo.patchedClassName;//修改前的类名,即oldclass
        String patchClassName = patchedClassInfo.patchClassName;//修改后的类名Control

//将oldClass的changeQuickRedirectField的值设置为patchObject的实例。
        try {
            oldClass = classLoader.loadClass(patchedClassName.trim());
            Field[] fields = oldClass.getDeclaredFields();
            //遍历Fields找到changeQuickRedirect
            Field changeQuickRedirectField = null;
            for (Field field : fields) {
                if (TextUtils.equals(field.getType().getCanonicalName(), ChangeQuickRedirect.class.getCanonicalName()) && TextUtils.equals(field.getDeclaringClass().getCanonicalName(), oldClass.getCanonicalName())) {
                    changeQuickRedirectField = field;
                    break;
                }
            }

            try {
         //加载补丁类
                patchClass = classLoader.loadClass(patchClassName);
                Object patchObject = patchClass.newInstance();
                changeQuickRedirectField.setAccessible(true);
         //将原类的changeQuickRedirectField设置为patchObject实例,即补丁类
                changeQuickRedirectField.set(null, patchObject);
            } catch (Throwable t) {
                Log.e("robust", "patch failed! ");
            }
        } catch (Throwable t) {
            Log.e("robust", "patch failed! ");
        }
    }
    Log.d("robust", "patch finished ");
    return true;
}
1 | 上述代码去掉了部分log信息,对关键的处理已经标注了注释,不难看出patch通过classLoader加载了原类和补丁Control类,并遍历原类中的Field找到changeQuickRedirect,将其赋值为一个补丁类的对象。(由于补丁Control类实现了changeQuickRedirect接口,因此可以直接赋值)。 |
if(changeQuickRedirect != null) {
    if(PatchProxy.isSupport(new Object[0], this, changeQuickRedirect, false)) {
        return ((Long)PatchProxy.accessDispatch(new Object[0], this, changeQuickRedirect, false)).longValue();
    }
}
1 | 我们看看源码中的PatchProxy中的isSupport()的实现: |
public static boolean isSupport(Object[] paramsArray, Object current, ChangeQuickRedirect changeQuickRedirect, boolean isStatic, int methodNumber, Class[] paramsClassTypes, Class returnType) {
//获取 classMethod = className + “:” + methodName + “:” + isStatic + “:” + methodNumber;
String classMethod = getClassMethod(isStatic, methodNumber);
    Object[] objects = getObjects(paramsArray, current, isStatic);
    try {
    //调用changeQuickRedirect.isSupport
        return changeQuickRedirect.isSupport(classMethod, objects);
    } catch (Throwable t) {
        return false;
    }
}
1 | PatchProxy中的isSupport()会调用changeQuickRedirect中的isSupport(),也就是补丁类中的isSupport(): |
public static Object accessDispatch(Object[] paramsArray, Object current, ChangeQuickRedirect changeQuickRedirect, boolean isStatic, int methodNumber, Class[] paramsClassTypes, Class returnType) {
    //同样获取 classMethod = className + ":" + methodName + ":" + isStatic + ":" + methodNumber;
    String classMethod = getClassMethod(isStatic, methodNumber);
    if (TextUtils.isEmpty(classMethod)) {
        return null;
    }

    Object[] objects = getObjects(paramsArray, current, isStatic);

    //调用changeQuickRedirect.accessDispatch。
    return changeQuickRedirect.accessDispatch(classMethod, objects);
}
1 | PatchProxy.accessDispatch调用changeQuickRedirect.accessDispatch: |
        var dexclassLoader = Java.use("dalvik.system.DexClassLoader");
    //hook 构造函数$init
    dexclassLoader.$init.implementation = function(dexPath,optimizedDirectory,librarySearchPath,parent){
        console.log("=====================\n")
        console.log("dexPath: "+dexPath);
        console.log("optimizedDirectory: "+optimizedDirectory);
        console.log("librarySearchPath: "+librarySearchPath);
        console.log("parent: "+parent);
      this.$init(dexPath,optimizedDirectory,librarySearchPath,parent);
    }
```
参考资料: